Wednesday, October 29, 2008

How to make money with free software...

For a dutch text click here.

Introduction
The Dutch Ministry of Finance organized an architecture competition for which a selected group of architectural offices (unstudio, nox, ...) and artists were invited, including myself. The goal of the competition was not to design a building, but the new 5 euro commemorative coin with the theme 'Netherlands and Architecture'. The winner will be rewarded with a nice price, but most of all with the honor: his design will be realized and will be a legal coin within the Netherlands.

I approached the subject 'Netherlands and Architecture' from two points of view. On one hand I paid tribute to the rich Dutch architecture history and on the other hand to the contemporary quality of Dutch architecture. These form also the two sides of my coin. Traditionally the front of the coin needs to portray the queen, while the back side displays the value of the coin.

Front side

When someone looks closely (click above on picture to enlarge) to my portrait of the queen, it becomes clear that her portrait is constructed with names of important Dutch architects. On the outside the names are clearly readable, while they slowly get smaller to the center. Under a magnifying glass all names are readable, but not with only the human eye. It is fascinating to see how an old medium like a coin can be in this way a 'compact disc' of information.

The tension between what is readable and what not, is also a metaphor how time shapes history. Some big names of the past, might be smaller names in the future and vice versa. To reflect this idea, I chose to order the architects not alphabetically or chronologically but in a new way: I used the internet as a seismograph and ordered the architects by the number of hits on the internet.
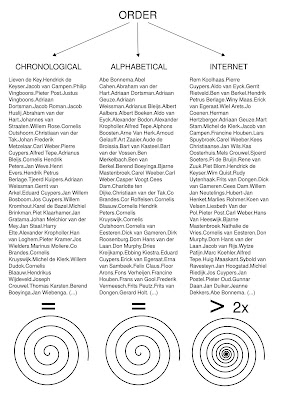


Of course this order changes over time and as such this is another time stamp on the coin besides the number '2008'. Only the first 109 architects fitted on the coin, so that was immediately the selection. Apparently becoming famous goes exponentially:


In order to achieve the image I developed my own single-line font system. I let the line width change within the same character in order to evoke an underlying picture:


Back side


Nowadays Dutch architecture is famous for its strong conceptual approach. This translates itself in the fact that there are not only a lot of books about Dutch architects, but also by Dutch architects.


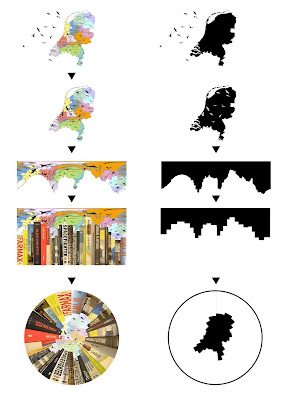
On the back side of the coin I treated the edge of the coin as a book shelve. The books rise as buildings towards the center. Through their careful placement they combine to outline the Netherlands, while birds’ silhouettes suggest the capitals of all the provinces. The following scheme reveals the process:


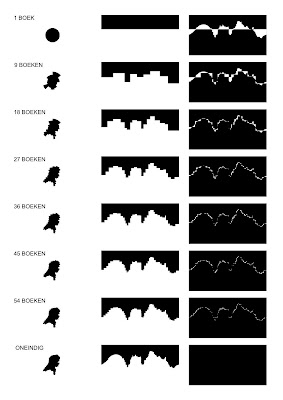
One of the issues was how many books to take: many thin books or fewer thick books. With one very thick book you would only get a circle. To get the best approximation of the Netherlands you would need books of only one page, which is not optimal either. Therefore I needed to find the optimum between these two extremes which you can see in the scheme below. On the left you see the approximation of the Netherlands, in the middle you see the 'skyline' of the books and on the right you see the difference between the 'skyline' of the books and of the border line of the Netherlands:


The following is the idea sketch for the birds. Each bird flies above the capital of each Dutch province. In the final coin these random birds are replaced with a bird which is typical for that province.


Technology
The whole design was done for 100% with free software. The biggest part consists of custom software in Python, of course within the SPE editor. For the visual power I used PIL and pyCairo. From time to time also Gimp, Inkscape and Phatch helped quite a bit. All the developing and processing was done on GNU/Linux machines which were running Ubuntu/Debian. In the end I had to collaborate closely on location together with the technicians of the Royal Dutch Mint (coin factory). So all the last bits were done on my Asus Eee PC. (I am still wondering why Asus doesn't offer Ubuntu on its netbooks.) The Eee laptop took a bit longer (30 seconds instead of 3 seconds to generate a whole coin), but did the job just fine. For looking up the number of hits on the internet, I rediscovered Yahoo, which provides a much better api for automatic querying than its competitors. Of course the jury judged only the design and not the software used as others used Maya, Illustrator, ...

And the winner is...
I am proud to announce that I won the competition! So soon 350.000 Dutch people will use the fruits of free software. I would have loved to release the coin under the GPL, which could maybe solve the financial crisis. However for obvious reasons I was not allowed to do that. There will be also special editions for collectors which can be bought world wide: a massive silver edition for € 30,95 and a massive gold edition for € 194,95. They will be probably sold out quickly as these are real collectors items. The coin is released in all Dutch post offices to the public the same day as the Intrepid Ibex: 30th October 2008.

Here are some scans of the real coin:


The coin will be advertised 20 times on prime time on Dutch television with a nice video clip (will be available soon) and advertisements will run in several newspapers. Today was the official launch of the coin, with from left to right: myself, Secretary of State for Finance De Jager, the Chief government Architect Liesbeth van der Pol and Master of the Mint Maarten Brouwer...

Liesbeth van der Pol toont het eerste Architectuur Vijfje (Bron foto: Githa van Eeuwen Fotografie)

Wednesday, June 11, 2008

Howto setup dual screen for Compiz in Ubuntu Hardy

If you need to give presentations with your laptop and you are running Ubuntu Hardy, you might find that the gnome-display-properties (System>Preferences>Screen Resolution) do not work out of the box. So it is impossible to connect a beamer unless you clone. The same is true for a dual screen setup with Compiz.


There is however a very easy trick to solve this. I have tested it with an Asus Eee PC 701 4G and with my Ati Radeon X600 desktop system. I am now enjoying running dual screen with all the 3d desktops enabled.

The problem is that the default screen size configuration is too small, which does not allow you to place too screens next to each other. On the other hand Compiz can not handle texture sizes bigger than 2048x2048, which means for example two monitors of 1024x768. If you want to use bigger resolution, it is still possible, but you will need to turn off compiz and will loose the 3d effects.

So to solve it, fire up a terminal:
$ sudo cp /etc/X11/xorg.conf /etc/X11/xorg.conf.backup
$ sudo gedit /etc/X11/xorg.conf


Then find the "Screen" section and change it like this:
Section "Screen"
Identifier "Default Screen"
Monitor "Configured Monitor"
Device "Configured Video Device"
SubSection "Display"
Virtual 2048 2048
EndSubSection
EndSection


To undo, you can just type:
$ sudo cp /etc/X11/xorg.conf.backup /etc/X11/xorg.conf


After doing this, you will be able to use gnome-display-properties with ease and run dual screen setups like this:

Monday, March 31, 2008

How to write a wxPython video player with Gstreamer

wxPython ships by default with the wx.MediaCtrl for very basic playback of music or videos. As I would like to do more advanced video manipulation, I was curious if I could use Gstreamer directly in wxPython to create my own pipelines. It was surprisingly easy.
For those who don't know Gstreamer, I quote the website (http://www.gstreamer.org):
GStreamer is a library that allows the construction of graphs of media-handling components, ranging from simple playback to complex audio (mixing) and video (non-linear editing) processing. Applications can take advantage of advances in codec and filter technology transparently.


There are python bindings for it, of which the documentation can be found on http://pygstdocs.berlios.de
I would also suggest to read these introductions to gstreamer & python:

I translated the video player example 2.2 of the tutorial from pyGtk to wxPython:
http://pygstdocs.berlios.de/pygst-tutorial/playbin.html

It should be straightforward to use this as a base for implementing your own pipelines. I work on Ubuntu, where I could install everything straight from the standard repositories.

Here is the source code:
#!/usr/bin/env python
#Example 2.2 http://pygstdocs.berlios.de/pygst-tutorial/playbin.html

import sys, os
import wx
import pygst
pygst.require("0.10")
import gst

import gobject
gobject.threads_init()

class WX_Main(wx.App):

def OnInit(self):
window = wx.Frame(None)
window.SetTitle("Video-Player")
window.SetSize((500, 400))
window.Bind(wx.EVT_CLOSE,self.destroy)
vbox = wx.BoxSizer(wx.VERTICAL)
hbox = wx.BoxSizer(wx.HORIZONTAL)
self.entry = wx.TextCtrl(window)
hbox.Add(self.entry, 1, wx.ALL|wx.ALIGN_CENTER_VERTICAL, 4)
self.button = wx.Button(window,label="Start")
hbox.Add(self.button, 0, wx.ALL|wx.ALIGN_CENTER_VERTICAL, 4)
self.button.Bind(wx.EVT_BUTTON, self.start_stop)
vbox.Add(hbox, 0, wx.EXPAND, 0)
self.movie_window = wx.Panel(window)
vbox.Add(self.movie_window,1,wx.ALL|wx.EXPAND,4)
window.SetSizer(vbox)
window.Layout()
window.Show()
self.SetTopWindow(window)

self.player = gst.element_factory_make("playbin", "player")
bus = self.player.get_bus()
bus.add_signal_watch()
bus.enable_sync_message_emission()
bus.connect('message', self.on_message)
bus.connect('sync-message::element', self.on_sync_message)

return True

def start_stop(self, event):
if self.button.GetLabel() == "Start":
filepath = self.entry.GetValue()
if os.path.exists(filepath):
self.button.SetLabel("Stop")
self.player.set_property('uri',"file://" + filepath)
self.player.set_state(gst.STATE_PLAYING)
else:
self.player.set_state(gst.STATE_NULL)
self.button.SetLabel("Start")

def on_message(self, bus, message):
t = message.type
if t == gst.MESSAGE_EOS:
self.player.set_state(gst.STATE_NULL)
self.button.SetLabel("Start")
elif t == gst.MESSAGE_ERROR:
self.player.set_state(gst.STATE_NULL)
self.button.SetLabel("Start")

def on_sync_message(self, bus, message):
if message.structure is None:
return
message_name = message.structure.get_name()
if message_name == 'prepare-xwindow-id':
imagesink = message.src
imagesink.set_property('force-aspect-ratio', True)
imagesink.set_xwindow_id(self.movie_window.GetHandle())

def destroy(self,event):
#Stop the player pipeline to prevent a X Window System error
self.player.set_state(gst.STATE_NULL)
event.Skip()

app = WX_Main()
app.MainLoop()

Tuesday, March 25, 2008

SPE packaged for Mac OS X

Krzysztof Olczyk did a wonderful job by packaging SPE for Mac OS X. You can download it here:
http://olczyk.krzysztof.googlepages.com/SPE.dmg

He commented:
You can install now SPE in your Macintosh in a way you do with native applcation.
Simply mount the DMG and drag the SPE to Applications folder.

Another advantage is, that now SPE will have its own icon in dock, like any application in Mac.

Have fun.

I will release soon SPE 0.8.4.e with some important bug fixes and I hope Krzysztof Olczyk will update the package for the Mac.

Please test the package and let Krystof know how it works.

Thanks Krystof!
Stani

Thursday, February 14, 2008

SPE 0.8.4.c Python IDE editor released

As SPE was being developed for more than a year in subversion, I thought it is time for a release again. This is a major bugfix release. It ships updated plugins and also some new features, especially if you use Linux or Blender, for which Witold did a great job. Thanks to the big help of MOTU pochu, this is added to Ubuntu Hardy. I would also like to thank in particular the webhost Zindep.com for their support and patience.

New features:
  • new versions of WinPdb debugger, PyChecker, wxGlade & XRCed gui designer
  • clear output pane
  • support for wxPython 2.8
  • linux support for nautilus, gnome-terminal, konqueror, konsole, thunar
  • improved blender support up to 2.45 (by Witold)
Fixes:
  • sidebar sash more tolerant
  • show path in title (linux)
  • run with filename with spaces
  • nicer debug dialog box
  • kill process fix
  • notebook
  • insert signature
  • numpad keys (by isolationism)
  • find tab with nonexisting files
  • add environment to SPE.py (linux)
  • better warning for documentation for unsaved files
  • better handling of new empty files
  • many more...
Installing on Debian(unstable) and Ubuntu Hardy:
sudo apt-get install spe
Installing on all other platforms:
  1. Download either the zip or tar ball from here
  2. Unzip it where you want and do NOT rename the _spe folder
  3. Start SPE from within the _spe folder with "python SPE.py"

Wednesday, February 6, 2008

Howto install sK1, a powerful alternative for Illustrator on Ubuntu

This post is deprecated as sk1 now has an official ubuntu installer:
http://sk1project.org/modules.php?na...ts&product=sk1

So this is for archival purposes only:

Igor, the icon king of Phatch, asked me if I could get sk1 to work on Ubuntu Gutsy. After playing around I found a way. Try this on your own risk.

I never heard about sk1 and looked it up on the website:
http://sk1project.org/

Why sk1project?

We think that sK1 is a powerful illustration program for the Linux platform that can substitute professional proprietary software like CorelDRAW or Adobe Illustrator and we hope the program and its derivatives will be helpful for you.

About sK1 vector graphics editor

sK1 is an open source vector graphics editor similar to CorelDRAW, Adobe Illustrator, or Freehand.
First of all sK1 is oriented for PostScript processing.
The major sK1 features:

* CMYK colorspace support
* CMYK support in Postscript
* Cairo-based engine
* Color managment
* Universal CDR importer (7-X3 versions)
* Modern Ttk based (former Tile widgets) user interface
It looks quite impressive and in five steps you can have it up and running on your Ubuntu Gutsy. It is a KDE application.

1) Installing required modules
Type this at a terminal:
sudo apt-get install liblcms-utils python-liblcms python-imaging-tk kdebase-bin
2) Installing tcl/tk8.5
Download the tk8.5 and tcl8.5 packages of Gustavo A. Díaz for the amsn project:
http://download.tuxfamily.org/amsnskins/packages/ubuntu/tcl-tk/

Open and install these files in this order with gdebi:
tcl8.5_8.5.0-2_i386.deb
tk8.5_8.5.0-2_i386.deb

3) Installing sk1
Now download the latest version of sk1 from:
http://sk1project.org/modules.php?name=Products&product=sk1

And convert it to a debian installer:
sudo alien sK1-0.9.0-rev324-0.mdv2008.i586.rpm
4) Patching sk1
We need to patch this file:
sudo gedit /usr/lib/python2.5/site-packages/sk1/app/managers/colormanager.py

Replace there on line 9:
from lcms import (...)
into
from lcms.lcms import (...)
5) Start sk1
Press Alt+F2 and type "sk1" at the terminal and sk1 is up and running! You can create a menu entry with alacarta or a desktop launcher with the command "sk1". I have not tested how well it works.

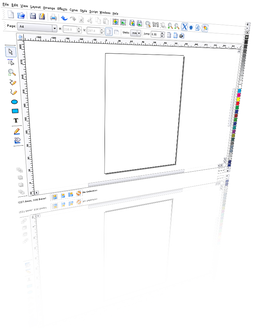
This is a screenshot, turned into perspective with Phatch:

Wednesday, January 16, 2008

Latest wxGlade, XRCed and Winpdb in subversion

So SPE is up to date again. The Winpdb debugger now features autocompletion. It is looking for a new name, as most people associate win with Windows (while winpdb is being developed on ubuntu now). The new XRCed (gui designer for wxpython) looks really slick. This is a screenshot on ubuntu:
Filter by topic: spe, python, ubuntu